Warning and Safety Notes
Radiation Safety Regulations
- This device must be used by operator who conform the Radiation Safety Regulations for the safety of both patient and operator
- Do not expose radiation around the genital area.
- It must be operated by operator authorized to use
- Radiation Shielding Devices must be installed according to Radiation Safety Regulations to prevent from exposure of radiation.
- If any problems arises while using, get your hands off the button immediately to be shut it down.
Be cautious about High voltage
- Do not disassemble this device since it carries a high voltage
Forbiddance to Modify Device
- Do not use any other accessories not permitted.
- Do not modify this device.

Specifications
X-ray generator
| Tube voltage | 40kV~60kV |
| Tube current | 2mA |
| Selectable exposure time | 0.01sec. ~ 1.30sec. |
| X-ray control method | Manual Setting |
Power adapter / charger
| Charger power | AC110~220V, 50/60Hz |
| Output voltage for charger | 5VDC or 12VDC |
| Charge Current for charger | 2A |
| National Certified adaptor used | |
Battery
| Battery type | lithium polymer battery |
| Battery capacity | 1460mAh |
| Supply voltage | DC 11.1V |
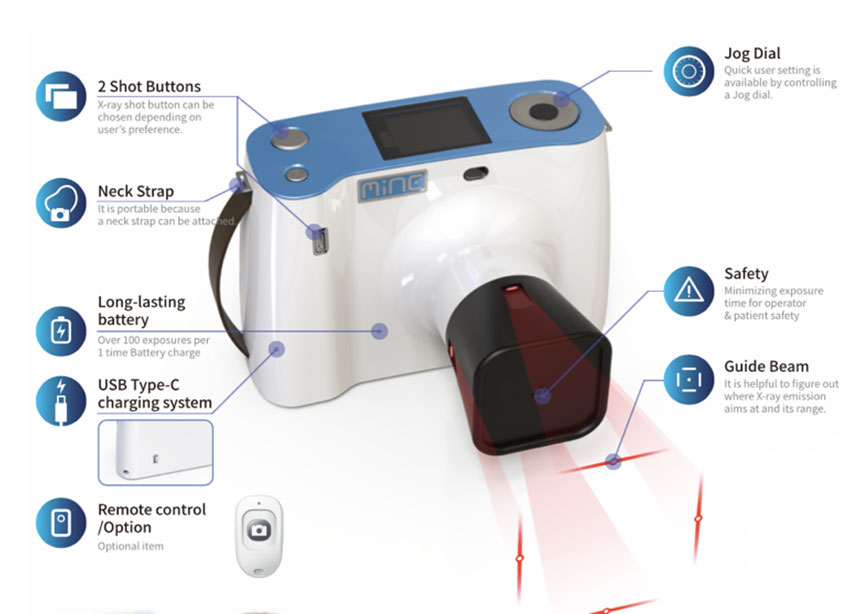
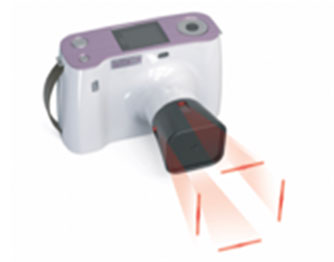
Components
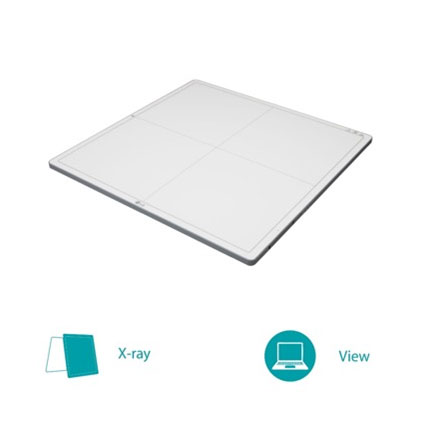
| Cone | Emitting X-ray |
| LCD Display | Indicating the value of setting and battery charge amount etc. |
| Grip | For using or moving device |
| Irradiation Button | For shooting X-ray |
| Power Button | On/off switch |
| Jog Dial | For setting up how to irradiate X-ray |
| USB Type-C Charge Connect & Firmware Input Terminal | For charging Batteries and updating Firmware |
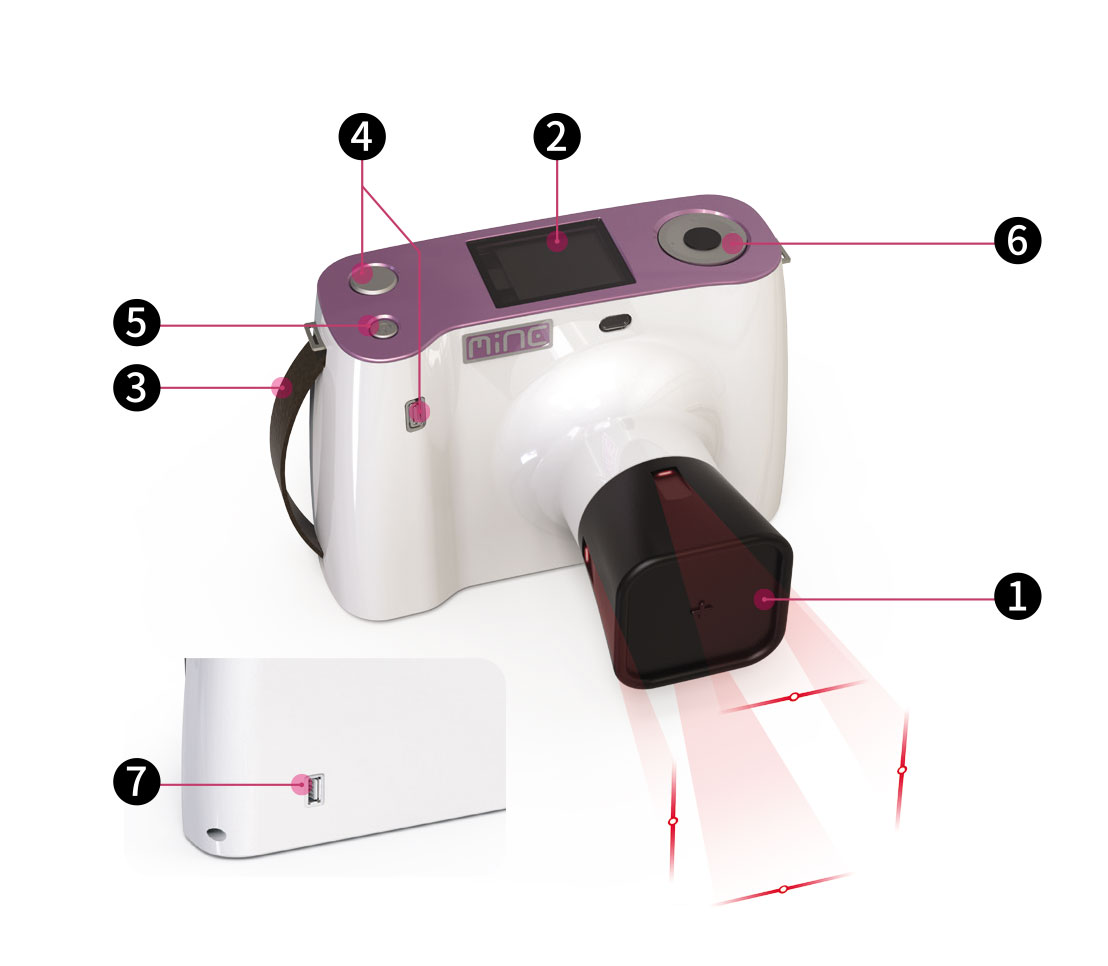
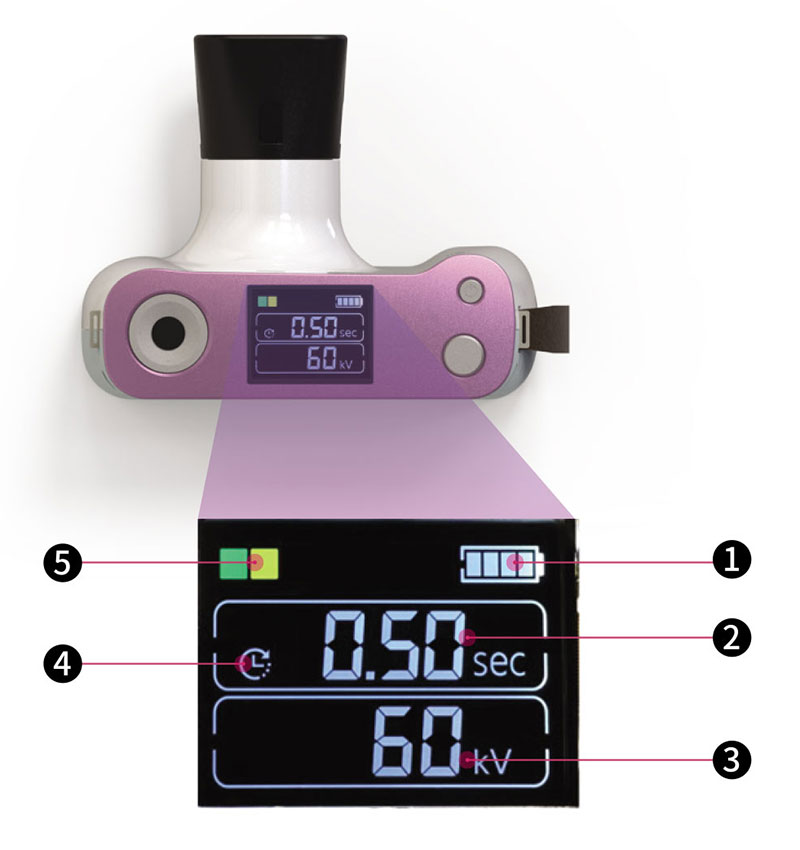
| Battery Capacity | Indicating battery charge amount |
| Irradiation Time | e Indicating irradiation time using Manual Settings *The value of 46 steps among 0.01~1.30sec. can be selected by Jog Dial |
| X-ray Output Tube Voltage | Indicating X-ray output tube voltage using Manual Settings *Available to choose the value among 40kV~60kV: Press the center button of Jog Dial, and choose a value with spinning the Jog Dial. |
| Lamp to indicate Waiting Time to irradiaten | Indicating Waiting time which must be needed to protect the device *This icon blinks during waiting time which takes 5~60sec. and it will be off when it is ready to irradiate. |
| Lamp to indicate progress in Irradiation | Indicating irradiation progress *Green light: Preheating, Yellow light: Irradiation |
Cautions
- Make sure to read User Manual before use.
- Do not give excessive pressure or shock to the device
- Keep away from children.
- Be sure to use this device with Grip to prevent from breaking or malfunctioning
- Do not use battery charger at any other purpose.
- Do not use in a humid atmosphere.
- Check if it is working when using device which has been out of use for a long time.
- Do not use in an extreme change of temperature.
- Do not use in the heavy dust.
- Do not use in Chemical storages or anywhere with generating Gas.
- Keep this device safe after use as it is a Diagnostic equipment for medical care.
Operating Instruction
How to Use
- Press the Power Button
- Make sure that LCD display is working.
- (1) Check the Battery charge status, and charge it fully if needed
- (2) Check if there is any messages for error.
- (3) It shows the last set value.
- Set your irradiation time and X-ray output tube voltage with Jog dial.
- (1) Select the time you want from 46steps which is among 0.01~1.30sec. using Jog Dial.
- (2) Select the value of X-ray output tube voltage you want from 46steps which is among 0.01sec~1.30sec using Jog Dial.
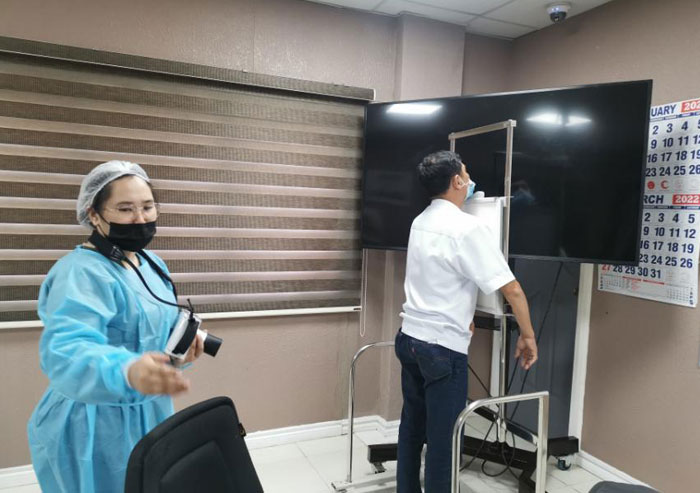
- Place a cone on the part where you want and a detector must be at opposite side of a subject, then press the Irradiation Button for shooting.
- (1) Place a cone on the part where you want then press the Irradiation Button lightly to indicate a Guide Beam and the press it strongly again for shooting.
- (2) When you press Irradiation Button, you can check some colors of light which indicate status for shooting on the display panel.
*Green light (Preheating) ->Yellow light (Irradiation)
*LED lamp is lit up with the sound like a “Beep” when starting irradiation - (3) Do not your hand off from Irradiation Button during shooting.
- (4) For next shooting, it needs some waiting time to protect the device from overheating.
- (5) Do not irradiate when it displays Error because it could be needed C/S or Battery Charge.
Battery Charge and Power Connection
- Be sure to use the charger included in product kit.
- Input voltage of Charger is AC 110~220V
How to keep after use
- Turn off the power with Power Button.
- Charge the battery if needed.
- Keep this device at room temperature.
- Store this device in the box included in product kit while not being used.
- When you carry this device via a long distance, make sure to keep it in the box included in product kit.
How to clean
- Check Power Button is off.
- Wipe with a dry cloth
- Do not use water, detergent and any other cleaning materials
- If you want to remove a lot of stains, just wipe out using a little amount of disinfectant with a piece of cloth. - Do not disassemble the device for cleaning, and only wipe out the outside of it.
- Be sure to prevent this device from moisture and if it happens, you must remove moisture fully before use
- Keep this device in the box or where being without dust and moisture after cleaning.
Key benefits of AI Portable X-Ray
 1. Safety
-
- Extremely low radiation dose (100~1,000 times less radiation dose)
-
- 2mA 60kVa (conventional X-Ray: 100~500mA)
-
- Safer use for pregnant women and infants
 2. Low Cost
-
- Space saving
-
- No shielding facility needed
-
- Fast shot-to-shot time, and Low maintenance cost
 3. Mobility
-
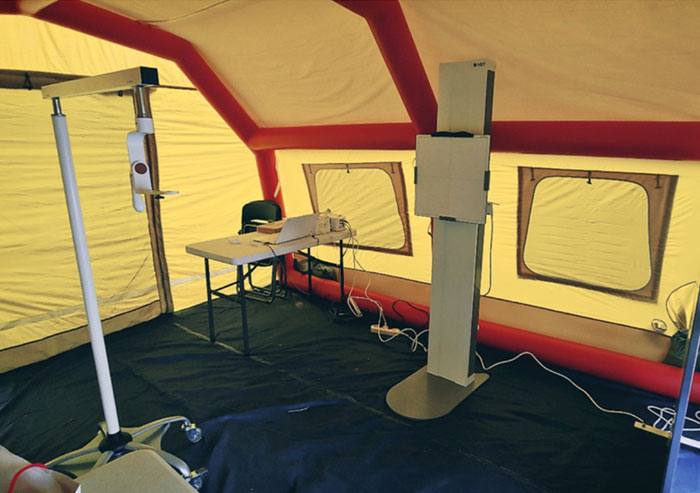
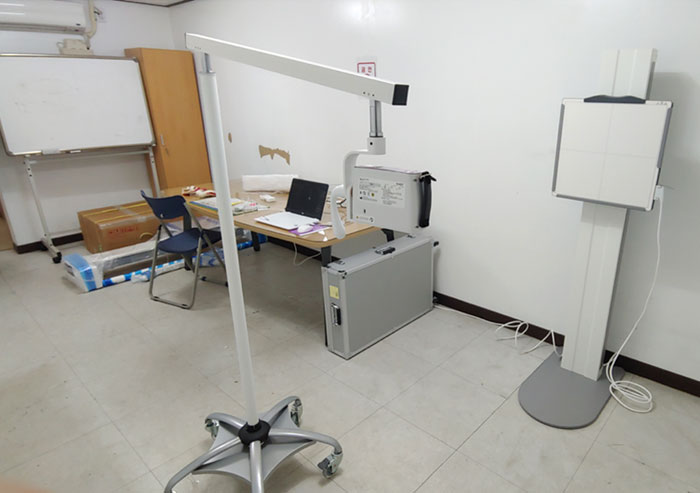
- Fully portable (can be installed at remote areas).
-
- Field use where electric power is unstable.
-
- Recharging via USB 3.0 port (100 shots after fully charged)
-
- Mobile clinic, Military, ambulance
 4. AI (Artificial Intelligence) based Analysis
-
- Reduce human errors and screening time for Chest X-ray image.
-
- Generate diagnostic report in 3~5 seconds.
Safety and Convenience
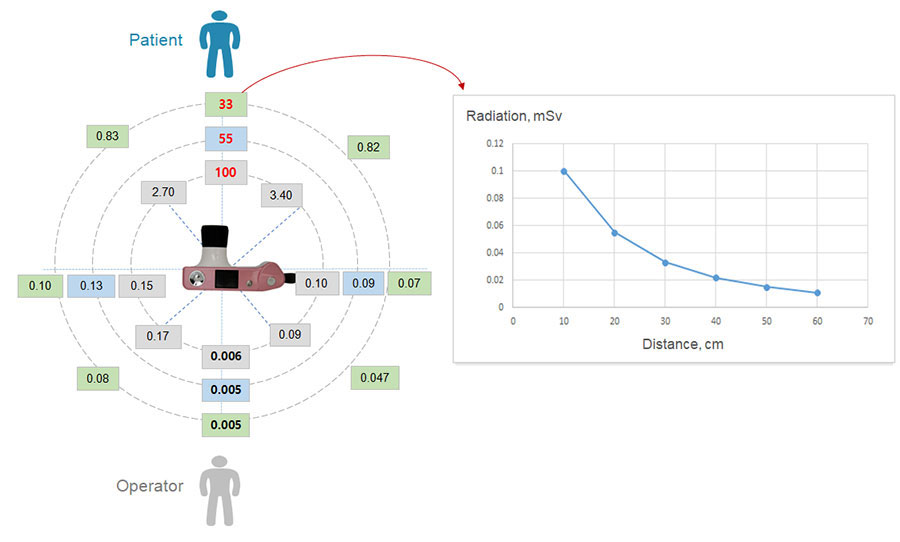
- Measured at 10cm, 20cm, 30cm from the device
- Unit : μSv
- Shooting time: 0.5 second (set to the severe condition)
Comparison of Radiation Dose
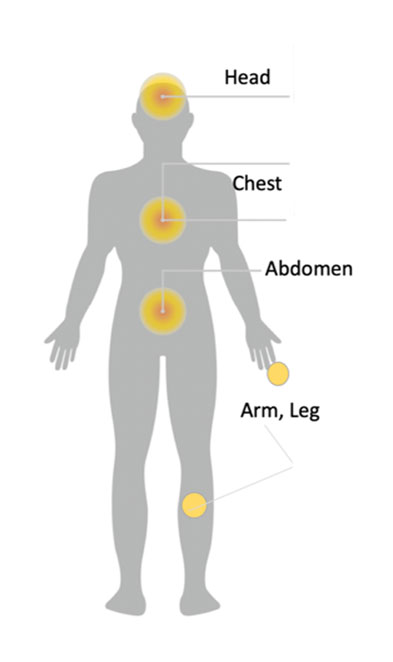
| HEAD | |
|---|---|
| Conventional | HDT MINE |
| 0.1mSv | 0.0021mSv |
| CHEST | |
|---|---|
| Conventional | HDT MINE |
| 0.05~0.3mSv | 0.0027mSv |
| ABDOMEN | |
|---|---|
| Conventional | HDT MINE |
| 0.6mSv | 0.0027mSv |
| ARM, LEG | |
|---|---|
| Conventional | HDT MINE |
| 0.05mSv | 0.0004mSv |
It greatly reduces worries of radiation dose for patients and operators
X-Ray Generator
| Focal Spot | 0.4mm |
| Tube kV/mA | Adjustable 40~60kb / Fixed 2mA |
| Expose Time | Selectable 0.01~1.30 sec |
| Wave Dose | 0.04 μSv (0.00004 mSv) |
| Power Supply | DC 11.1V(Battery) |
| Output Power | 120W |
| Input Power | X-ray Unit : DC5~12V, 2.1A Battery Charger : 240V, 50~60Hz, 1A |
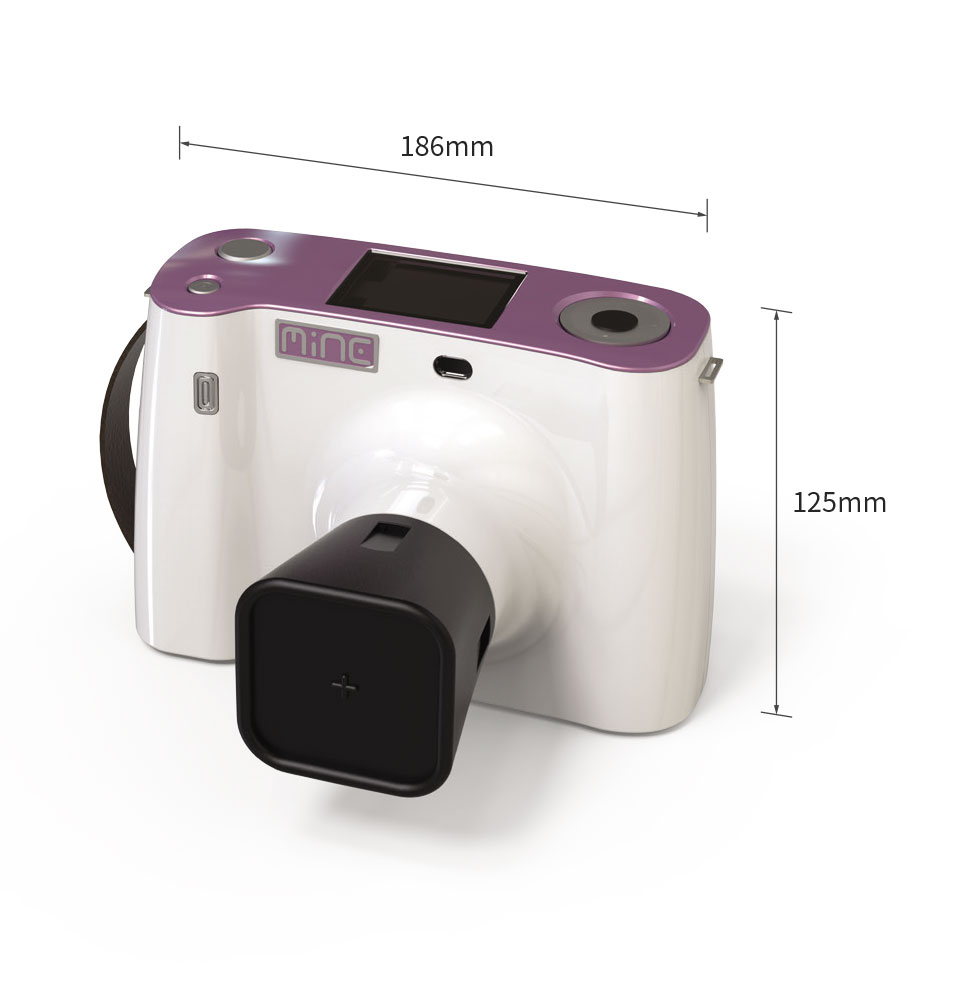
| Size/Weight | 188.5*145*127mm / 1.8kg |
DR Detector
- 3.2 Light Weight
- Superior Image Quality
- Water Resistance
- Dustproof
- Durability
| Focal Spot | 0.4mm |
| Tube kV/mA | Adjustable 40~60kb / Fixed 2mA |
| Expose Time | Selectable 0.01~1.30 sec |
| Wave Dose | 0.04 μSv (0.00004 mSv) |
| Power Supply | DC 11.1V(Battery) |
| Output Power | 120W |
| Input Power | X-ray Unit : DC5~12V, 2.1A Battery Charger : 240V, 50~60Hz, 1A |
| Size/Weight | 188.5*145*127mm / 1.8kg |
Durability of Detector unit
IP41: Waterproof and Dustproof
IP*41 resistance rating ensures that LG DXD will be protected against objects of 1mm or larger and dripping liquids such as blood and bodily fluids.

Durability of Detector unit
 *Maximum load weight: uniform load 150kg (331lb), point load 100kg (220lb)
Magnesium and Carbon-fiber Body
With a super strong body that combines carbon-fiber with magnesium, LG DXD is not only lightweight, but also exceptionally strong.
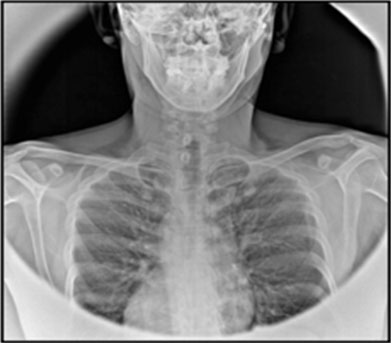
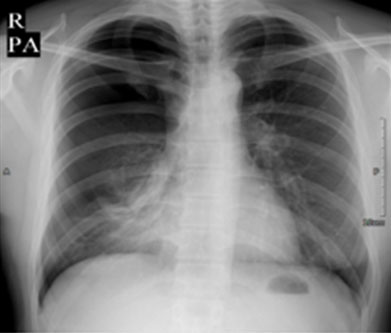
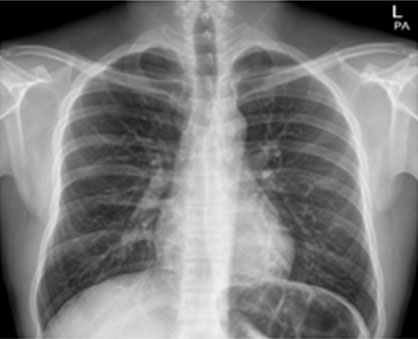
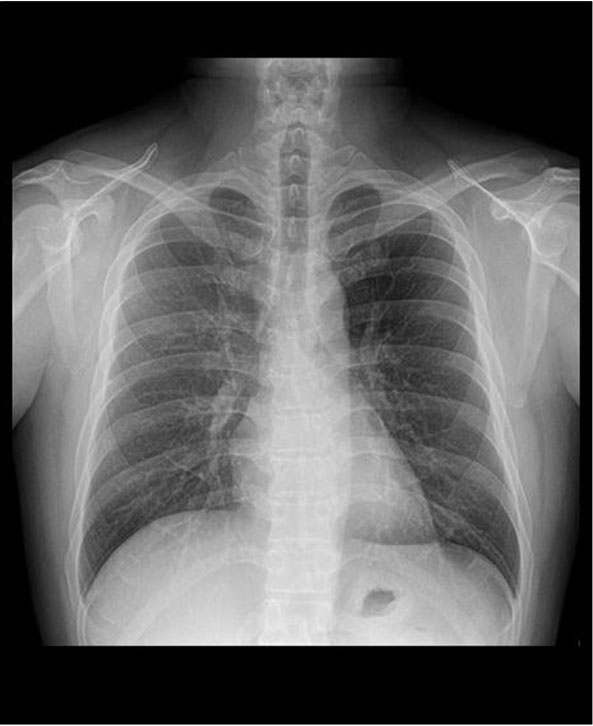
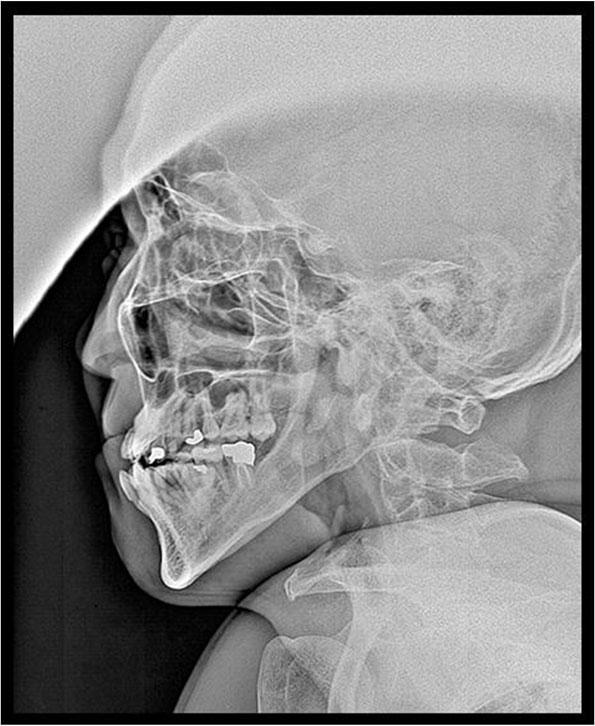
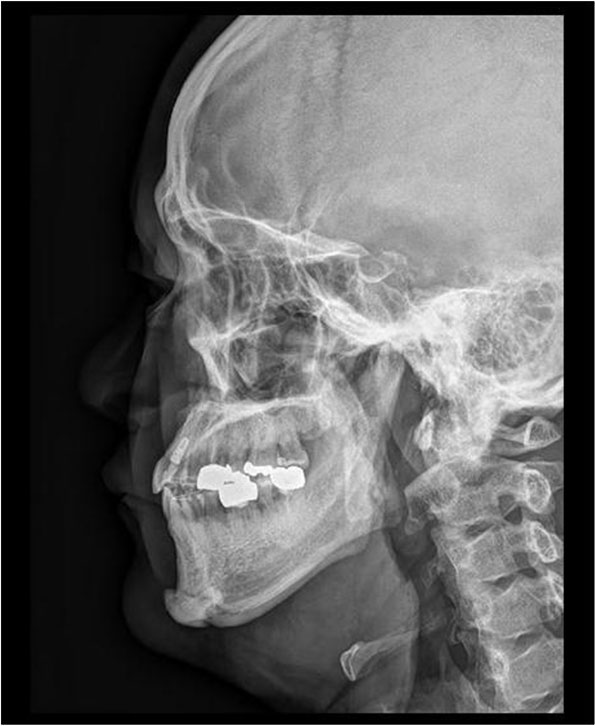
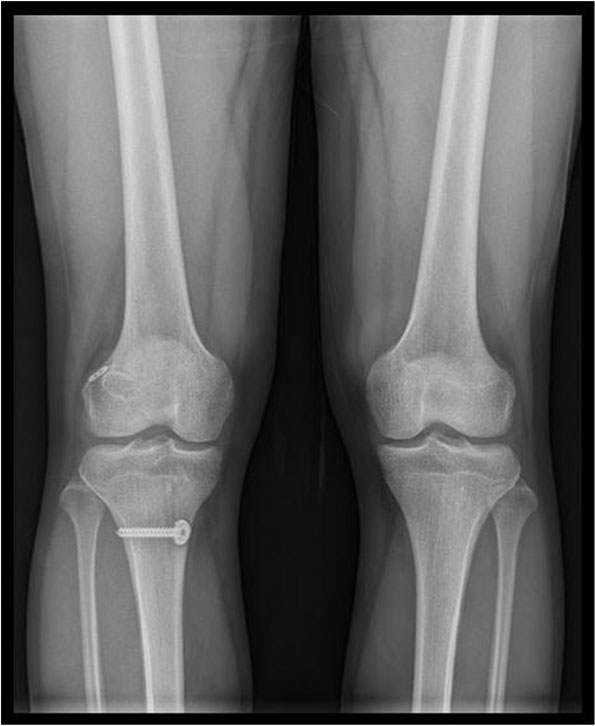
Comparison of X-Ray Images
| Mine 2 | Product A | Product B |
 |
 |
 |
| 60kV | 40~150kVp | 40~150kV |
| 2mA | 10~1000mA | 10~630mA |
| 0.01~1.3sec | 0.001~10sec | 0.001~6.3sec |
| DC5V,DC12V/22.1A (Internal Power) | 380V, 180A | 380V, 180A |
 |
 |
 |
| * Condition: 60kV, 2mA, 0.5sec | * Condition: 80kVp, 200mA | * Condition: 100kVp, 200mA |
Mine Image
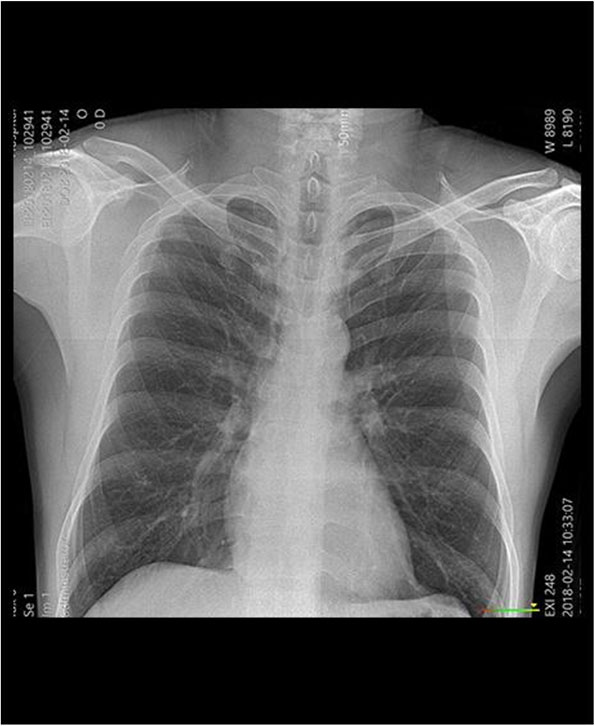
General X-ray Image
Mine Image
General X-ray Image
Mine Image
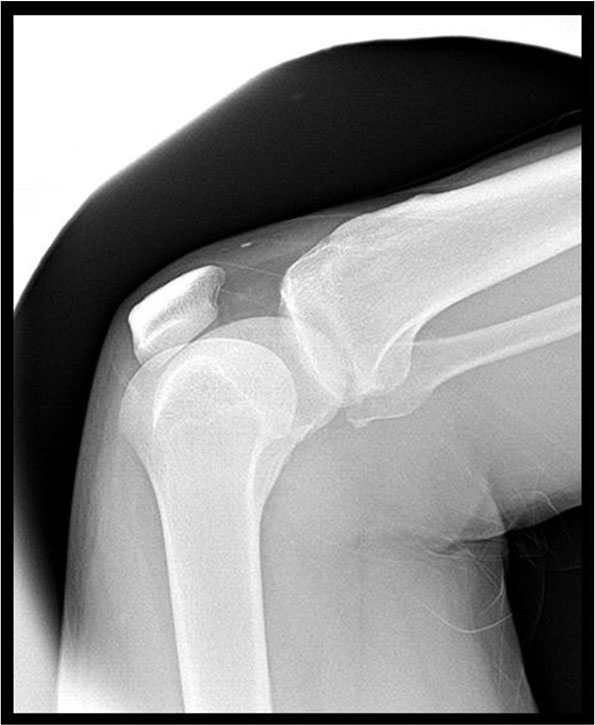
General X-ray Image
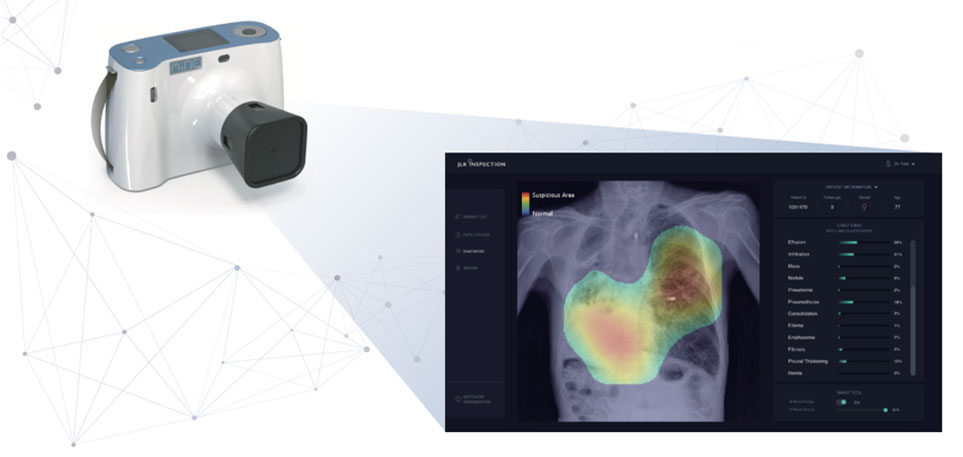
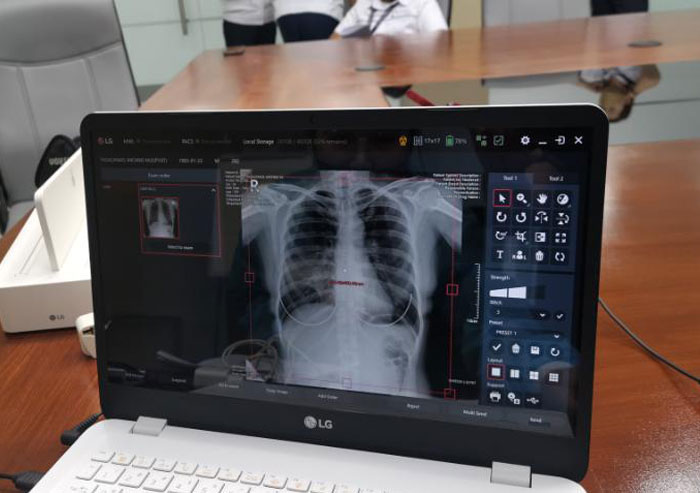
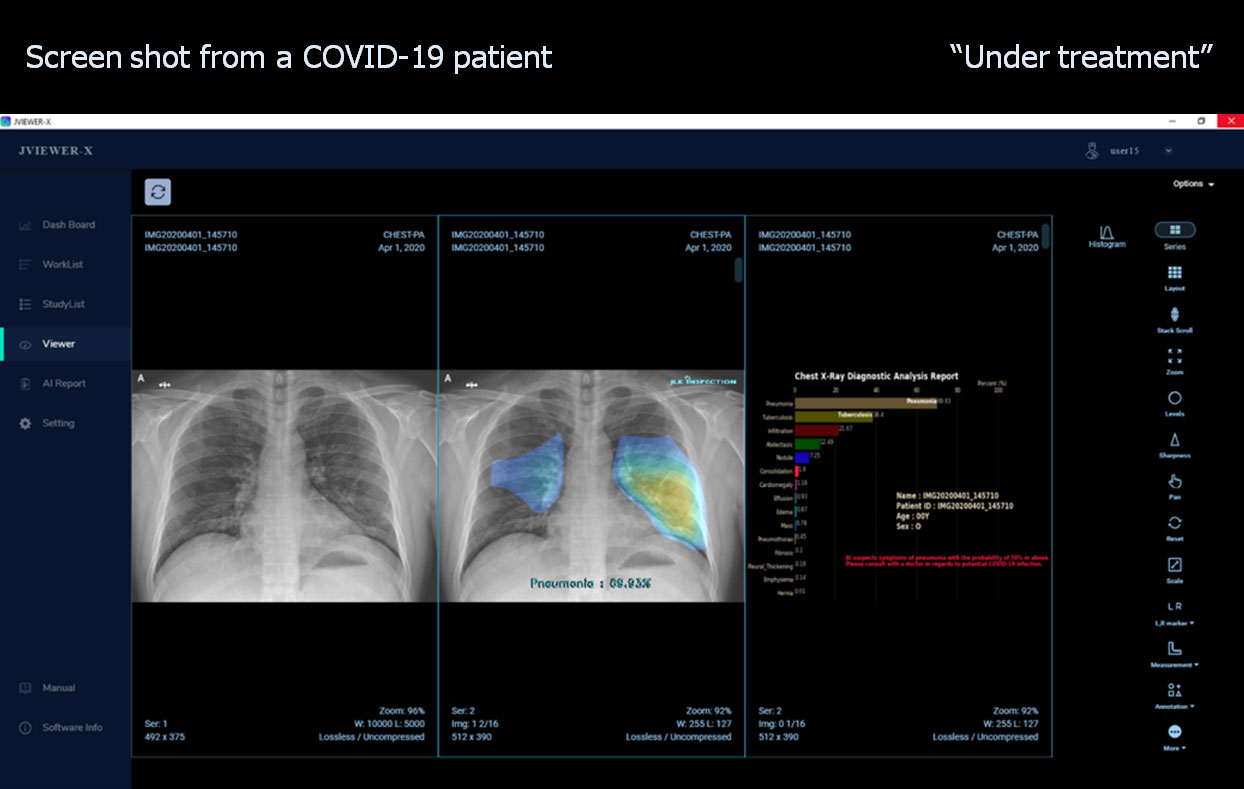
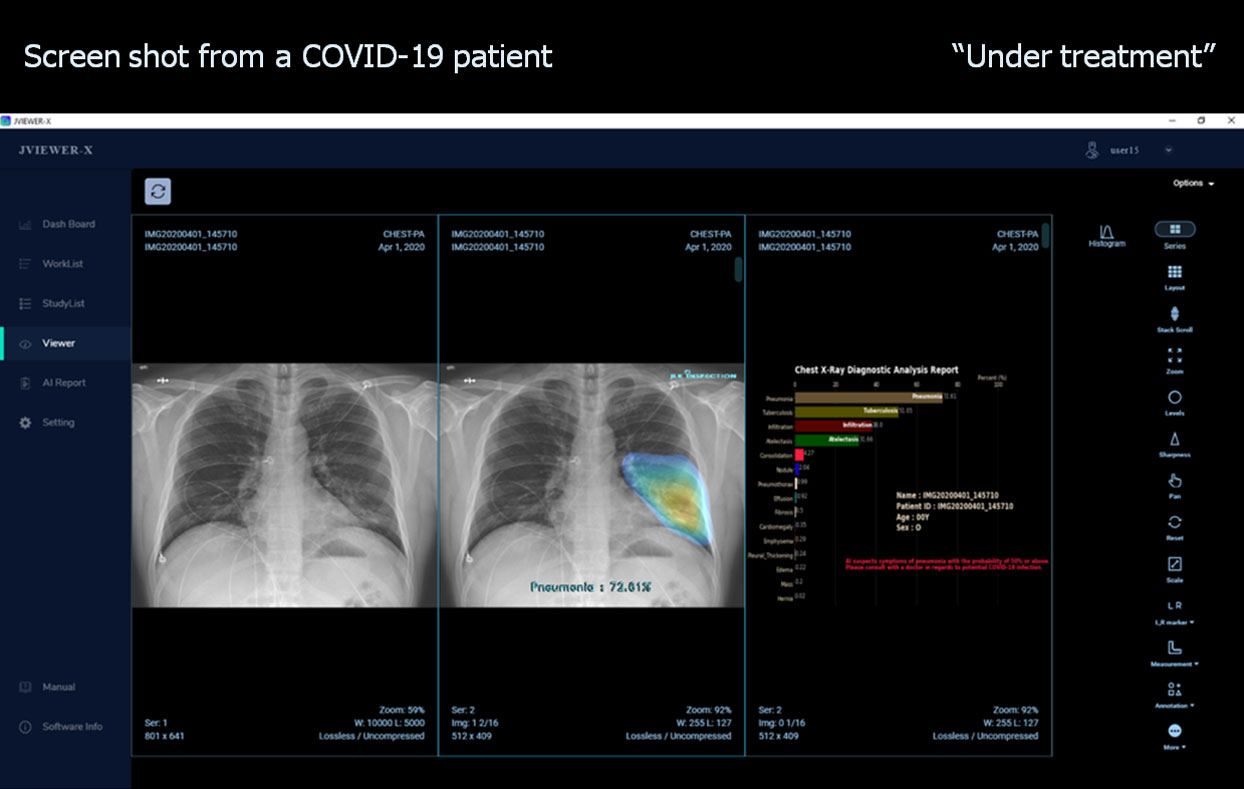
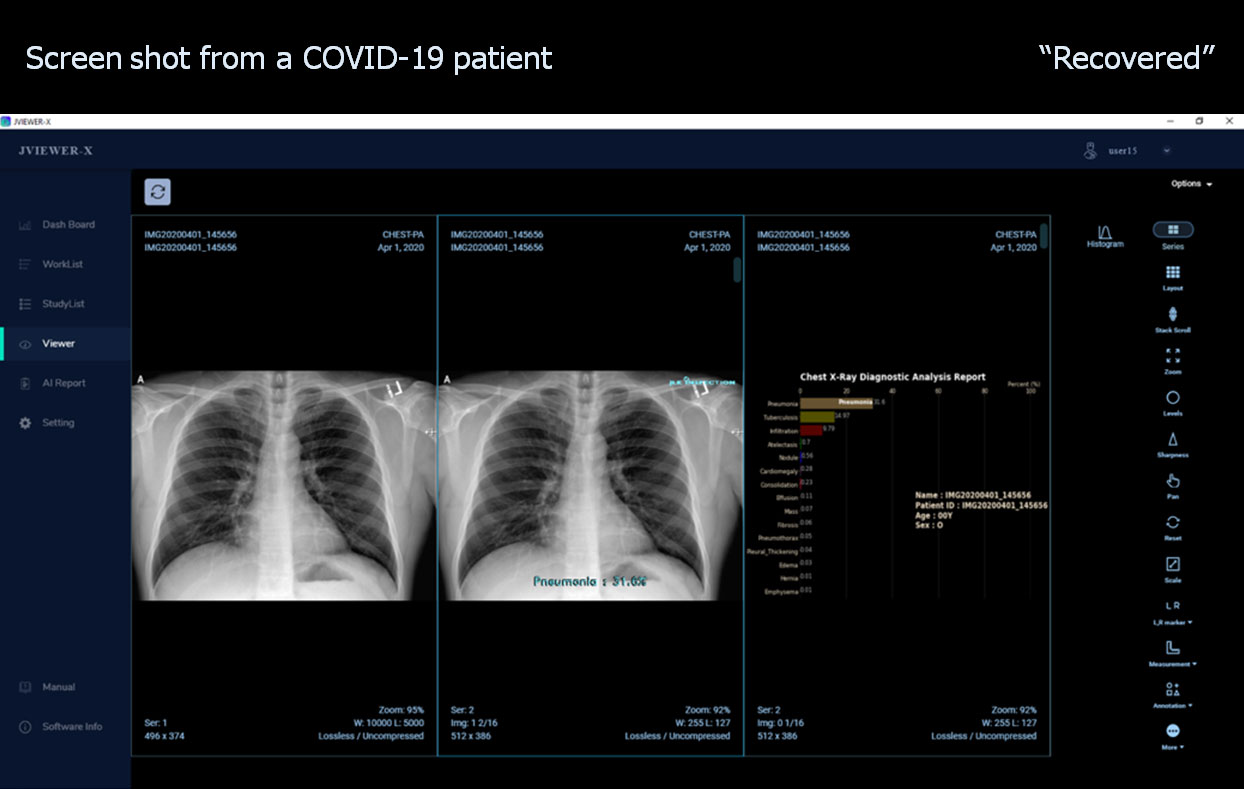
"Take Chest X-Ray and Get the AI Based Abnormality Analysis Anywhere and Anytime!"
How it works
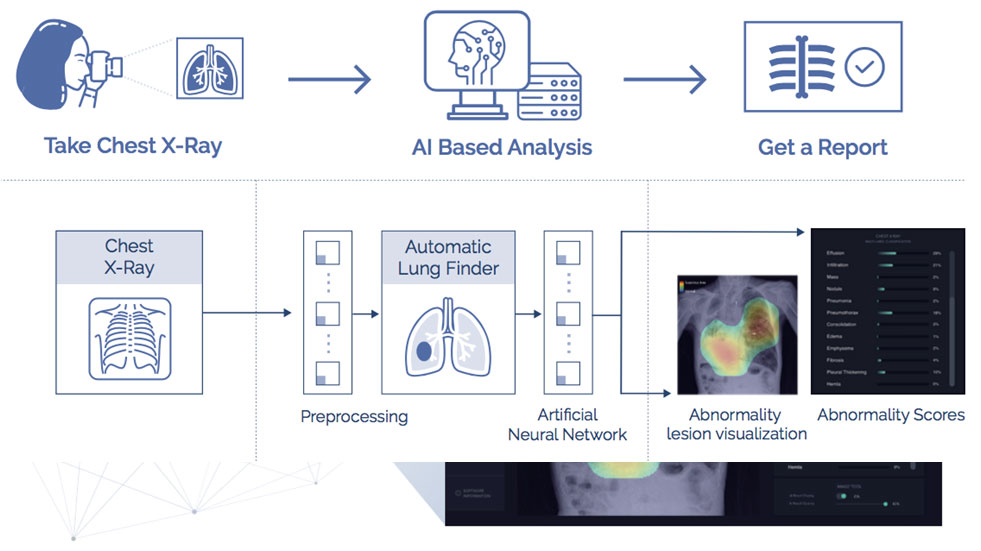
Get a report Anywhere and Anytime

Detailed Features
- AI based abnormality score.
- Heatmap visualization of abnormal lesion.
- AI model based on the state-of-the-art Convolutional Neural Network algorithm.
- Trained over 1.1 million chest x-ray data with full annotation and verification.
- < 5s per scan.
- Seamless PACS integration.
- 15 different detailed abnormality scores including TB.
- Wireless x-ray machine like a regular camera.
- Easy to carry.
- Low output radiation.
- Integrated telemedicine.
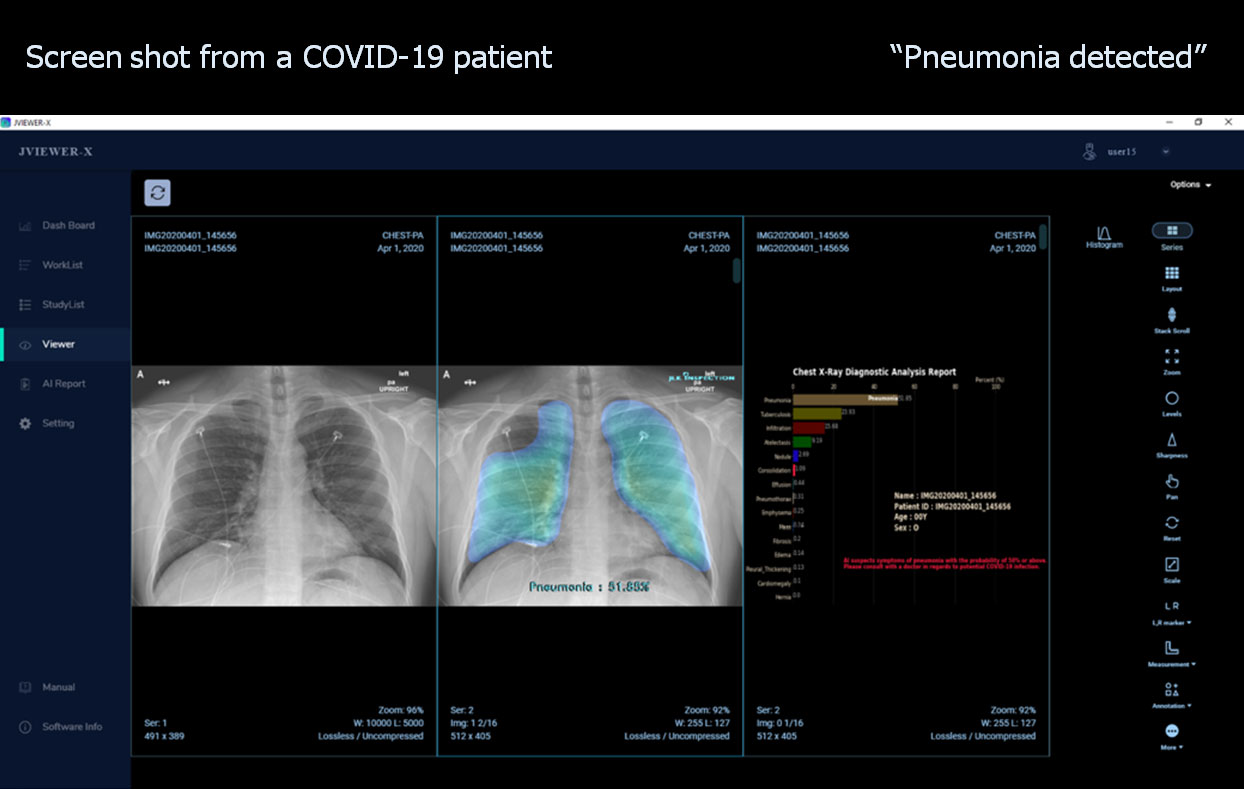
X-Ray Based Lung Disease Classification Solution
AI medical system that diagnoses lung diseases using simple chest X-ray images and clinical information.
The system is based on an artificial neural network technology for lesion detection and lung diseases classification. It also provides the AI analyzed probability of having each lung disease in a numerical form.
Key Functions
- Lung diseases multi-label classification
- Lung diseases lesion auto-detection and visualization
- The probability of having each lung disease
- Annotation tool for lesion marking and correction
- Register and visualize clinical information
- PACS-linked patient data management
- Analysis result report
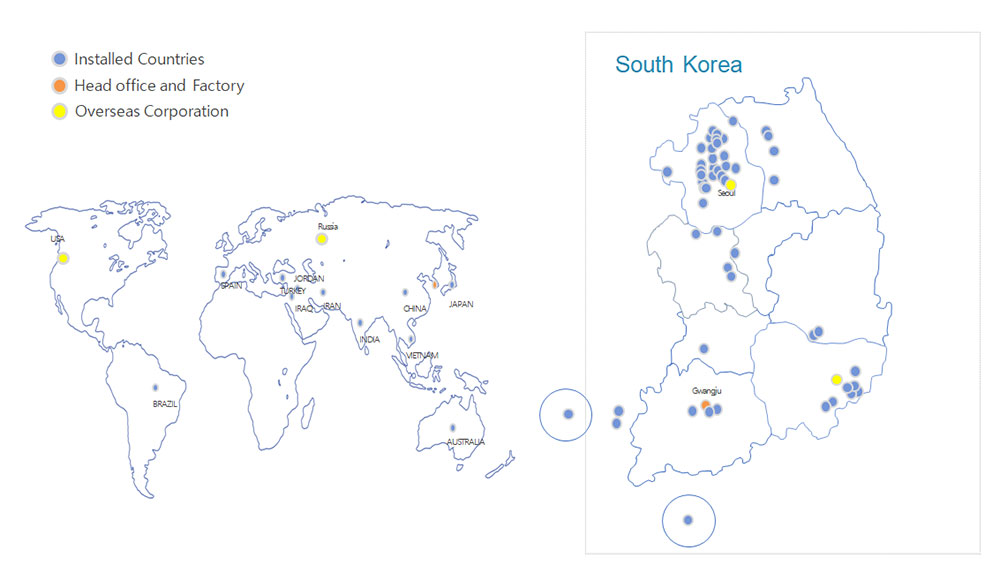
Installed Sites in Korea and Other regions
Comparison of diagnostic process
“2~3 hours” High risk of infecting the facility Taking more resources